

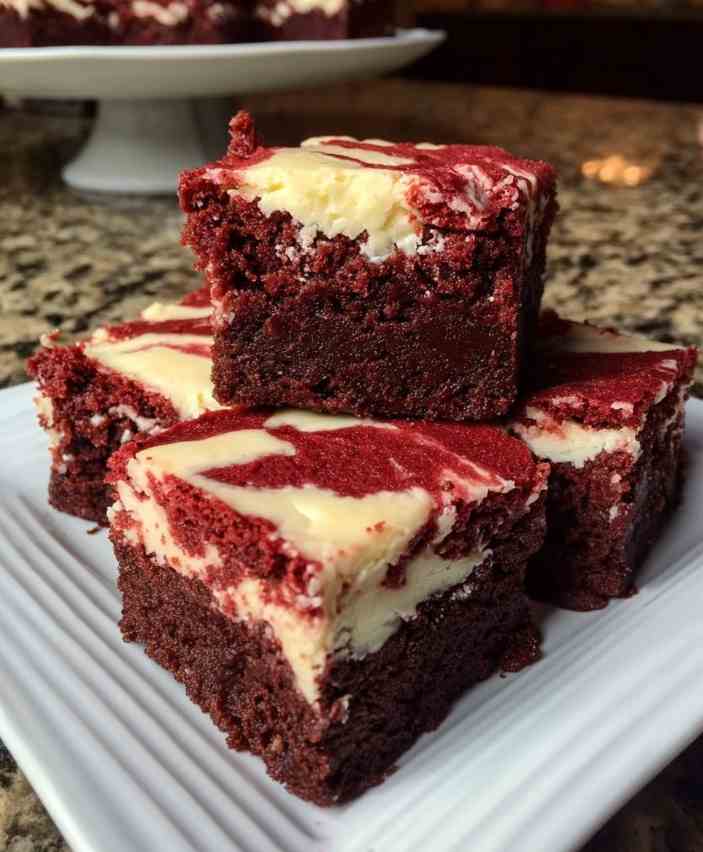
Have you ever bitten into something so rich and creamy it practically stopped time for a second? That’s exactly what happens with these red velvet cheesecake brownies. They’re the dessert version of falling in love—one layer deeply fudgy and chocolatey, the next silky smooth and tangy. It’s the kind of treat that makes you pause mid-bite and go, “Oh wow.”
Advertisements
Whether you’re baking for Valentine’s Day, a cozy weekend, or just a Tuesday that needs a lift, these brownies deliver. They’re simple enough for beginners but fancy enough to look bakery-made. Let’s be honest—you’ll want to make a double batch because people will ask for seconds.
Advertisements

Ingredients
For the Red Velvet Brownie Layer
- 1 cup (125g) all-purpose flour
- ½ cup (50g) unsweetened cocoa powder
- 1 cup (200g) granulated sugar
- ½ cup (115g) unsalted butter, melted
- 2 large eggs
- 1 teaspoon vanilla extract
- 1 tablespoon red food coloring
For the Cheesecake Layer
- 8 oz (225g) cream cheese, softened
- ¼ cup (30g) powdered sugar
- 1 large egg
(Optional toppings: white chocolate drizzle, crushed pecans, or extra cocoa powder for dusting)
Step-by-Step Instructions
1. Prep the Pan and Oven
Preheat your oven to 350°F (175°C). Grease an 8×8-inch baking dish and line it with parchment paper for easy removal. This tiny step makes cutting those perfect squares a breeze later.
Advertisements
2. Make the Brownie Batter
In a bowl, whisk together flour, cocoa powder, and sugar until evenly mixed. Add melted butter, eggs, vanilla extract, and red food coloring. Stir gently until the batter turns thick, glossy, and completely red. It should feel dense but pourable—like molten velvet.
3. Create the Cheesecake Layer
In a separate bowl, beat cream cheese until smooth and creamy (no lumps allowed). Add powdered sugar and the extra egg, mixing until velvety. This mixture should spread easily but hold its shape.
Advertisements
4. Layer It Up
Spread half of your red velvet brownie batter into the pan. Dollop the cheesecake mixture over it, smoothing gently with a spatula. Spoon the remaining brownie batter on top, then use a butter knife to swirl the two layers together for that classic marbled look.
5. Bake to Perfection
Bake for 25–30 minutes, or until a toothpick inserted in the center comes out mostly clean (a few moist crumbs are okay). The top should look slightly glossy, and the edges just set. Let them cool in the pan for 10 minutes, then lift out carefully and cool completely before cutting.
Quick Check: If the center still jiggles when you tap the pan, give it 3–5 more minutes.
Advertisements
Tips & Tricks for Perfect Results
- Use room-temperature ingredients: Cold cream cheese or eggs can cause lumps or uneven texture.
- Don’t overmix: Stir only until ingredients come together. Overworking the batter makes brownies tough.
- Test early: Start checking at 25 minutes—every oven bakes differently.
- Patience pays off: Let them cool fully before slicing. The cheesecake layer sets beautifully as it rests.
- Add a swirl: Use a toothpick or butter knife to create a marbled top—it’s eye candy!
Substitutions & Variations
- Gluten-Free Version: Use a 1:1 gluten-free baking flour.
- Vegan Swap: Replace eggs with flaxseed “eggs” (1 tbsp flax + 3 tbsp water each) and use vegan cream cheese and butter.
- White Chocolate Swirl: Melt ¼ cup white chocolate and drizzle it into the cheesecake layer before baking.
- Nutty Crunch: Stir chopped walnuts or pecans into the brownie batter for extra texture.
- Berry Burst: Add a spoonful of raspberry puree into the cheesecake layer for a fruity twist.
Serving Ideas
- With Ice Cream: A scoop of vanilla or strawberry ice cream takes it to the next level.
- With Coffee or Espresso: The bitterness balances the sweetness perfectly.
- With Fresh Berries: Raspberries or strawberries add color and tang.
- As a Gift: Wrap individual squares in parchment and tie with twine for homemade dessert gifts.
Storage & Reheating Instructions
- Cool Completely: Always let them cool before storing to avoid sogginess.
- Store: In an airtight container in the fridge for up to 1 week.
- Freeze: Wrap each brownie individually and freeze up to 2 months. Thaw in the fridge overnight.
- Reheat: Microwave for 10–15 seconds or warm in the oven at 300°F (150°C) for 5–10 minutes for that fresh-baked feel.
Nutrition Information (per serving)
| Nutrient | Amount |
|---|---|
| Calories | 250 |
| Fat | 12g |
| Saturated Fat | 7g |
| Carbohydrates | 34g |
| Sugar | 20g |
| Fiber | 1g |
| Protein | 3g |
| Cholesterol | 50mg |
| Sodium | 150mg |
(Values are approximate and depend on specific brands used.)
Frequently Asked Questions
Can I use a boxed brownie mix?
Yes! Prepare the mix as directed, add the red food coloring, and layer it with the cheesecake mixture as written.
Why did my cheesecake layer crack?
It usually happens from overbaking or using cold ingredients. Let everything reach room temperature first.
Can I make these ahead of time?
Absolutely. They taste even better the next day after chilling overnight—the flavors meld beautifully.
How do I get clean slices?
Use a sharp knife wiped clean between cuts, and chill the brownies before slicing.
And there you have it red velvet cheesecake brownies that look bakery-perfect but feel like home. They’re the kind of dessert that stops conversations and starts memories. The color, the texture, the creaminess everything works in harmony.
Bake them once, and you’ll see why they’ve earned their “steal your heart” title. So go ahead—preheat that oven, grab your mixing bowl, and treat yourself (and maybe someone special) to a square of pure happiness.
If you make this recipe, share your photo—I’d love to see how your red velvet cheesecake brownies turned out!

Red Velvet Cheesecake Brownies Recipe
Ingredients
For the Red Velvet Brownie Layer
- 1 cup (125g) all-purpose flour
- ½ cup (50g) unsweetened cocoa powder
- 1 cup (200g) granulated sugar
- ½ cup (115g) unsalted butter, melted
- 2 large eggs
- 1 tsp vanilla extract
- 1 tbsp red food coloring
For the Cheesecake Layer
- 8 oz (225g) cream cheese, softened
- ¼ cup (30g) powdered sugar
- 1 large egg
Instructions
- Prep the Pan and OvenPreheat your oven to 350°F (175°C). Grease an 8×8-inch baking dish and line it with parchment paper for easy removal. This tiny step makes cutting those perfect squares a breeze later.
- Make the Brownie BatterIn a bowl, whisk together flour, cocoa powder, and sugar until evenly mixed. Add melted butter, eggs, vanilla extract, and red food coloring. Stir gently until the batter turns thick, glossy, and completely red. It should feel dense but pourable—like molten velvet.
- Create the Cheesecake LayerIn a separate bowl, beat cream cheese until smooth and creamy (no lumps allowed). Add powdered sugar and the extra egg, mixing until velvety. This mixture should spread easily but hold its shape.
- Layer It UpSpread half of your red velvet brownie batter into the pan. Dollop the cheesecake mixture over it, smoothing gently with a spatula. Spoon the remaining brownie batter on top, then use a butter knife to swirl the two layers together for that classic marbled look.
- Bake to PerfectionBake for 25–30 minutes, or until a toothpick inserted in the center comes out mostly clean (a few moist crumbs are okay). The top should look slightly glossy, and the edges just set. Let them cool in the pan for 10 minutes, then lift out carefully and cool completely before cutting.
Quick Check: If the center still jiggles when you tap the pan, give it 3–5 more minutes.
Advertisements