
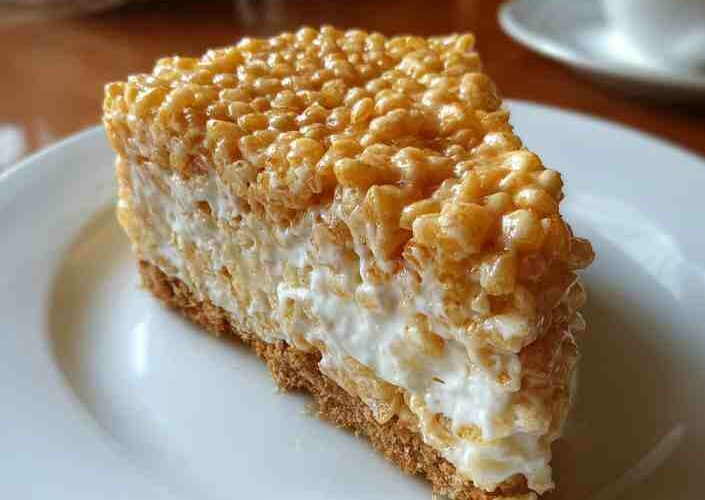
This No-Bake Rice Krispies Cheesecake is a playful, nostalgic, and irresistibly creamy dessert that brings together two iconic classics—crispy marshmallow cereal treats and smooth, fluffy cheesecake. With its crunchy cereal crust and cloud-like filling, this no-bake treat is perfect for parties, birthdays, holidays, and anytime you’re craving something sweet without turning on the oven. Simple ingredients, zero baking, and a melt-in-your-mouth texture make this cheesecake a guaranteed crowd-pleaser.
Advertisements
Ingredients
For the Rice Krispies Crust
- 6 cups Rice Krispies cereal
- ¼ cup salted butter
- 1 (10 oz) bag mini marshmallows
For the Cheesecake Filling
- 1 (8 oz) block cream cheese, softened
- ½ cup granulated sugar
- 1 teaspoon pure vanilla extract
- 1 (7 oz) jar marshmallow crème
- 1 (8 oz) tub Cool Whip, thawed
Optional Garnish
- Whipped cream
- Cubed Rice Krispies treats
Instructions
1. Prepare the Pan
Grease a 9- or 10-inch springform pan generously with nonstick spray. Set aside.
Advertisements
2. Make the Crust
In a saucepan over low heat, melt the butter and marshmallows together until smooth. Immediately pour the mixture over the Rice Krispies cereal in a large bowl and stir until fully coated.
3. Form the Crust
Press the warm cereal mixture into the prepared springform pan, pushing it firmly across the bottom and slightly up the sides. Let the crust set for 15–20 minutes at room temperature.
Advertisements
4. Prepare the Filling
In a mixing bowl, beat the cream cheese, sugar, and vanilla extract until smooth. Add marshmallow crème and continue beating until creamy. Gently fold in the Cool Whip to keep the filling light and airy.
5. Assemble the Cheesecake
Spread the creamy filling evenly over the cooled crust and smooth the top.
Advertisements
6. Chill to Set
Refrigerate for at least 2 hours (or overnight) until the cheesecake is firm and sliceable.
7. Garnish and Serve
Add dollops of whipped cream and sprinkle with cubed Rice Krispies treats before serving. Slice with a warm knife for clean cuts.

Pro Tips
- Let the cream cheese soften fully for a silky-smooth filling.
- Fold the Cool Whip gently—overmixing makes the filling dense.
- Chill long enough for clean slices and the best texture.
- Wet your knife with warm water before slicing for perfect cuts.
- Add garnish right before serving to keep everything crisp.
Advertisements
Why This Recipe Works
- No oven needed—quick, easy, and perfect for warm days.
- Fun, nostalgic flavor combining cereal treats with creamy cheesecake.
- Ideal texture—crunchy crust paired with light, fluffy filling.
- Make-ahead friendly for parties and celebrations.
- Loved by kids and adults thanks to its sweet, playful charm.
Substitutions & Variations
1. Chocolate Peanut Butter Version
Add 2 tbsp peanut butter to the crust mixture and swirl melted chocolate into the filling.
2. Strawberry Krispies Cheesecake
Mix diced strawberries or puree into the filling and top with fresh berries.
3. Cookies ‘n Cream Twist
Add crushed sandwich cookies to both the crust and filling.
4. Gluten-Free Version
Use gluten-free crispy rice cereal and check marshmallow labels for gluten-free certification.
Make-Ahead, Storage & Reheating Guide
Make-Ahead
Prepare up to 24 hours in advance. Chill overnight for best texture.
Storage
- Refrigerator: Keep covered for 3–5 days.
- Freezer: Freeze whole or sliced for up to 2 months. Thaw in the refrigerator overnight.
Reheating
No reheating required—serve cold straight from the fridge.
Serving Ideas
- Add colorful sprinkles for birthday celebrations.
- Drizzle with caramel or chocolate sauce for extra sweetness.
- Cut into small squares for dessert tables or party platters.
- Pair with fresh berries for a refreshing finish.
- Serve with hot cocoa or iced coffee for a fun treat combo.
Nutrition (Per Serving Estimate)
Approximate values (may vary):
- Calories: 320
- Fat: 14g
- Carbohydrates: 45g
- Sugar: 32g
- Protein: 3g
Frequently Asked Questions
1. Can I use homemade whipped cream instead of Cool Whip?
Yes! Whip 1 cup of heavy cream with 2 tbsp powdered sugar and fold it in gently.
2. Can I make this recipe the day before?
Absolutely. In fact, it tastes even better after chilling overnight.
3. What can I use instead of marshmallow crème?
Melt 1 cup mini marshmallows with 1 tablespoon corn syrup as a substitute.
4. How do I keep the crust from turning soggy?
Allow the crust to cool completely before adding the filling and store the cheesecake chilled.
5. Can I add chocolate chips or candy?
Yes! Mini chocolate chips, M&M’s, or crushed cookies make delicious add-ins.
This No-Bake Rice Krispies Cheesecake is a playful, creamy, and crunchy dessert that brings joy to every bite. With easy ingredients, quick prep, and irresistible flavor, it’s the perfect sweet treat for any occasion—from family gatherings to festive celebrations. Make it once, and it’s bound to become a dessert everyone requests again and again.
No-Bake Rice Krispies Cheesecake
Ingredients
For the Rice Krispies Crust
- 6 cups Rice Krispies cereal
- ¼ cup salted butter
- 1 (10 oz) bag mini marshmallows
For the Cheesecake Filling
- 1 (8 oz) block cream cheese, softened
- ½ cup granulated sugar
- 1 tsp pure vanilla extract
- 1 (7 oz) jar marshmallow crème
- 1 (8 oz) tub Cool Whip, thawed
Optional Garnish
- Whipped cream
- Cubed Rice Krispies treats
Instructions
- Prepare the PanGrease a 9- or 10-inch springform pan generously with nonstick spray. Set aside.
- Make the CrustIn a saucepan over low heat, melt the butter and marshmallows together until smooth. Immediately pour the mixture over the Rice Krispies cereal in a large bowl and stir until fully coated.
- Form the CrustPress the warm cereal mixture into the prepared springform pan, pushing it firmly across the bottom and slightly up the sides. Let the crust set for 15–20 minutes at room temperature.
- Prepare the FillingIn a mixing bowl, beat the cream cheese, sugar, and vanilla extract until smooth. Add marshmallow crème and continue beating until creamy. Gently fold in the Cool Whip to keep the filling light and airy.
- Assemble the CheesecakeSpread the creamy filling evenly over the cooled crust and smooth the top.
- Chill to SetRefrigerate for at least 2 hours (or overnight) until the cheesecake is firm and sliceable.
- Garnish and ServeAdd dollops of whipped cream and sprinkle with cubed Rice Krispies treats before serving. Slice with a warm knife for clean cuts.
Notes
- Ensure crust is pressed evenly for a stable base.
- Add toppings right before serving to keep them crisp.
- For the best texture, chill at least 2 hours or overnight.
- Softened cream cheese makes mixing smooth and easy.
- Freeze without garnish for the best results.
Advertisements